
This Week’s
Project:
Felted Bag
for Marika
I have a
3.25 year old (going on 13 – just to do the cliché thing) Marika and a brand spanking new 1 year old, Remi; they are absolutely beautiful, intelligent and buuuuusy beings! I can’t help but invest every inch of my soul into spending the day with them..

Well, I’ve lost a little balance in looking after others Vs. looking after
myself..
This week I decided to experiment and start projects that I do just by myself.
Well, I enjoyed it but it didn’t happen without plenty of frustrations lol
– yep, can laugh now ;) … but you know in those moments, you’re doing something (in this case, trying to thread the damn sewing needle) and the 1 yr old has her siren yell starting, the 3 yr old is asking for juice or wants the gate open to go wee or she’s rolling the fit ball around trying to hit the 1 yr old with it – whatever it is, action is needed soon with them both..
– yep, can laugh now ;) … but you know in those moments, you’re doing something (in this case, trying to thread the damn sewing needle) and the 1 yr old has her siren yell starting, the 3 yr old is asking for juice or wants the gate open to go wee or she’s rolling the fit ball around trying to hit the 1 yr old with it – whatever it is, action is needed soon with them both..
The anxiety builds, ... you stay calm on the outside and try to ignore it a little… then the inner voice picks up its volume:
“Come on kids! Please! I just want some time to myself for a little bit!”… then my guilt rivals up..
“What am I doing? I need to be there for my kids! They are more important than this bag! If I do something for them now I could have some time later.. who am I kidding, I won’t have time later!”… then words from my psychologist hop on in…
“It’s important for the girls to see you spending time on yourself, doing your own thing.”
You get the point :)
Well I finished it!
I have a laundry with a pile of dirty clothes so high I can't reach the top; 3 piles of cleaned clothes/nappies/linen in the playroom (which no longer looks like a playroom) to fold; and a fly infested kitchen..
But hey, I made a bag lol
I have a laundry with a pile of dirty clothes so high I can't reach the top; 3 piles of cleaned clothes/nappies/linen in the playroom (which no longer looks like a playroom) to fold; and a fly infested kitchen..
But hey, I made a bag lol
Ahem.. so let's get onto it, shall we ;)
Please note: I'm an extreme amateur sewer, so I lack the appropriate jargon and professionalism involved with such projects!
Please note: I'm an extreme amateur sewer, so I lack the appropriate jargon and professionalism involved with such projects!
Materials Used
(I didn’t use anything to measure; felt can be manipulated a little with it’s fibrous composition)
(I didn’t use anything to measure; felt can be manipulated a little with it’s fibrous composition)
- 3
sheets of brown felt (front and back of bag, handles)
- 1
sheet of beige felt (sides and bottom of bag)
- ½
sheet of felt (I used grey, because it’s a darker colour, to put another layer
of felt on the inside bottom of the bag)
- 20
x 1” by ¾” felt rectangles (I used red,
dark and mid-road green, lime green, yellow, beige, mid-road brown)
- 7
buttons for decorations
- 1
button for buttoning the bag shut
- Cotton
thread (I used yellow to sew on the rectangles because I like the look of
seeing stitches; I used maroon on the brown, because I didn’t have brown lol; I
used orange and white on the buttons); I used about 7 strands of thread to keep
the felt ball strap together, but it would be much better to use thicker thread/yarn
if you have a bigger needle
- Materials for Felt balls: Wool roving/tops and a felt needle: I used these
to make the felted balls on the strap.
You can wet felt the balls but it was just easier in the lounge room with the
girls to needle (albeit, still a little nervous that they’d reach over fast and
find a needle through their little hand)I also recently learnt you could possibly source already made felt balls from spotlight :)

I hand sewed
the WHOLE bag.. but I suspect if you’re handy with a sewing machine than this
bag would be whipped up in ½ the time ;)
So, here we
go…
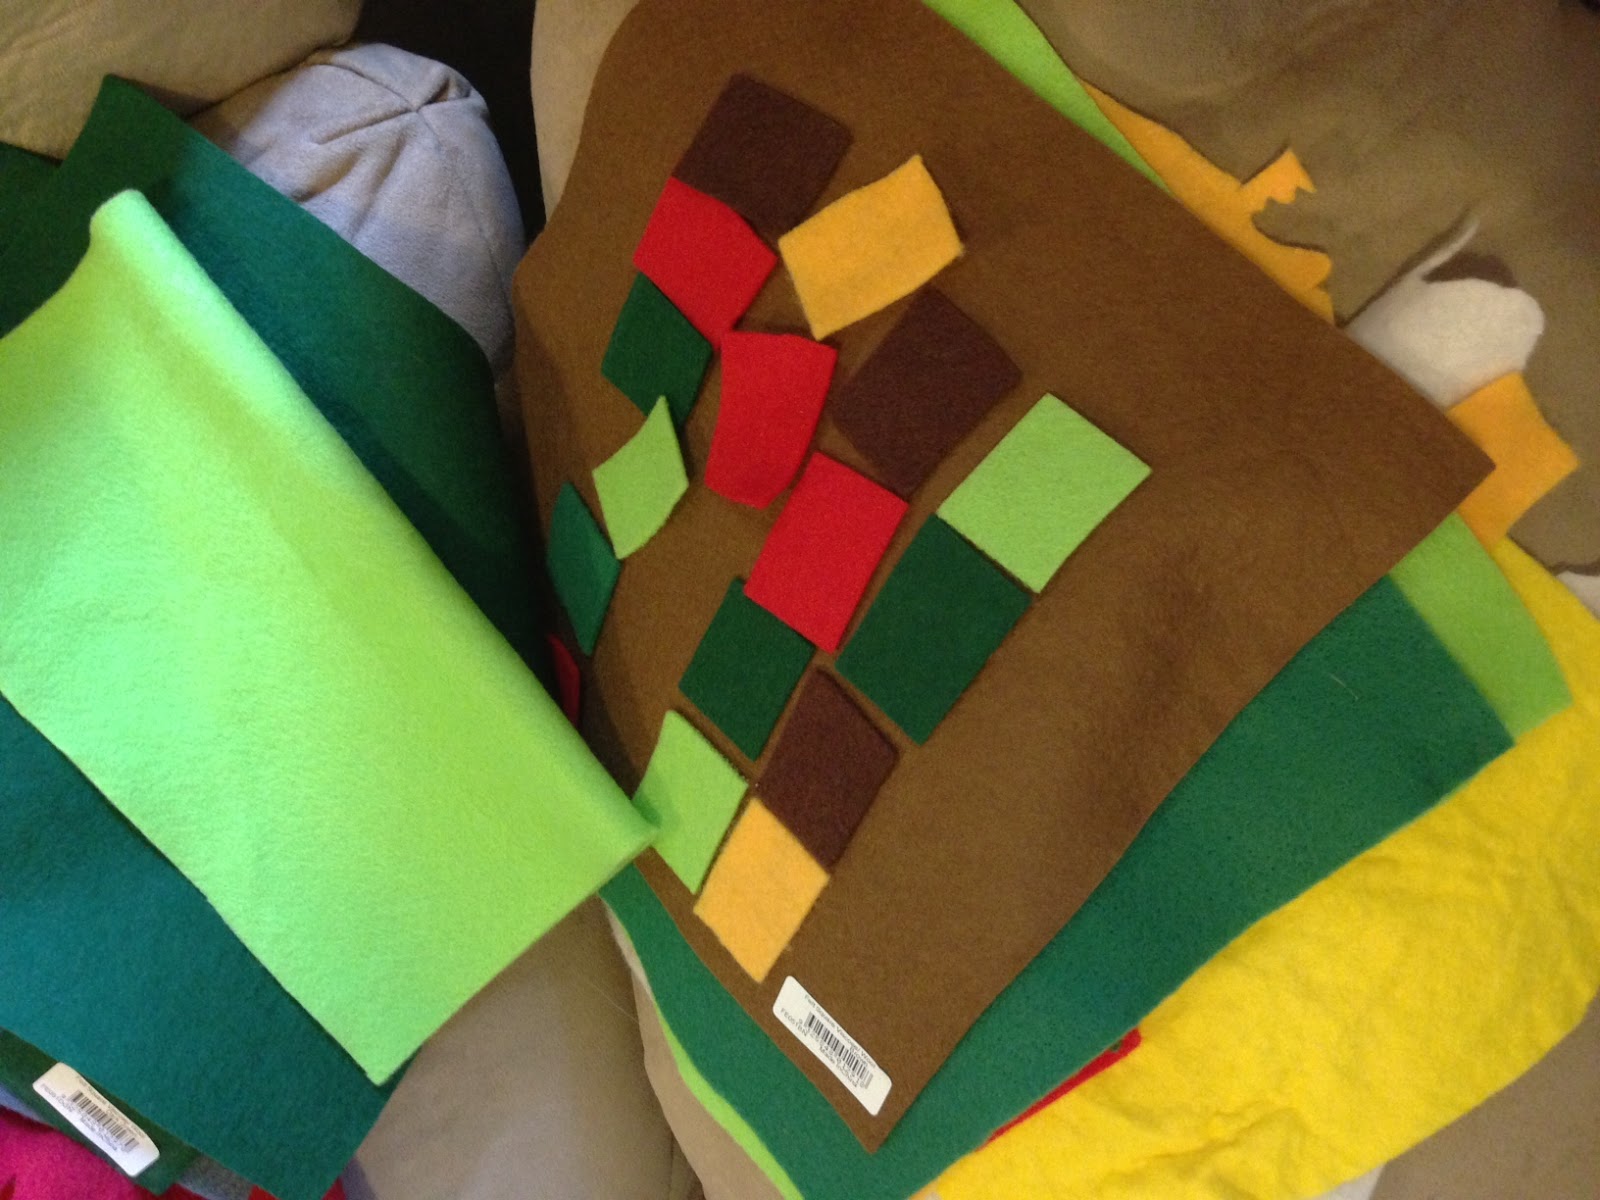
1. I grabbed the coloured felt and cut
up all the little rectangles.
2. I started laying them out on the brown
felt sheets (the back has 5 x 4 and the front has 5 x 3).
3. I sewed them on with a simple
straight stitch and cutting some rectangles to fit better.. I wasn’t concerned
with lining the rectangles up on the inside rows/columns but kept an eye on
making sure the outside edges were roughly lined up. The rectangles all had different thicknesses
and stretch, which made me consider which felt to use for the sides/bottom of
the bag for wear and tear.
I put the thread knots on the inside and was making sure I put the knots closer
to the middle rather than the outside, but in the end it didn’t matter.
At this point I still wasn’t sure what I was making lol
4. I cut along the edges of the biggest
side (the back) leaving ~1cm edge.
5. I laid the back piece over the front
piece and cut around it so the front and back pieces (roughly) matched in size.
6. I used the beige coloured felt for
the bottom and sides because it was thicker than the other sheets of felt.
I cut a rectangle into the beige felt so it lined up with the bottom edge
measurement of the bag, then roughly cut the width that I wanted the bag;
7. I then cut 2 more rectangles into the
beige felt for the sides, using the height measurement of the bag and the width
of the base piece.
8. I then laid the beige sides of the
bag on the bottom beige piece and straight stitched them. The contents of the bag would stress those
stitches so I did put a lot of extra stitches there.
9. I stitched the beige bottom piece up
with the brown front and back pieces using straight stitch.
10. I wasn't completely confident that one layer of felt would hold the weight of contents that could be put in the bag (if it was going to be that); so I cut a rectangle piece of grey fabric and sewed it on the bottom inside of the bag.

11. From here I could hold the sides,
front and back of the back up and together to see what it would look like and
chose buttons that I thought would be suitable.
I didn’t put buttons on every rectangle because I thought it would be
too heavy for the felt.
I then laid buttons out and re-arranged them until I was happy with the
balance.. then sewed the buttons on.
12. I then sewed up the sides of the bag with
straight stitch.
13. I didn’t like the ruffled, weak edge
at the top of the bag, so I folded the edge over ~1cm (as with it all, no
measuring was done) and straight stitched it all around.

14. I wanted more strength in sides of the bag rather than it ballooning out, so I decided to pinch and sew the sides. It was tricky sewing through 7 layers of felt at times so I used professional things like my phone to push the needle through from behind lol This is how I pinched it together:

I did sew the brown felt together about ~1cm down from this pinched side just to strengthen it all a little more.
I used very rough stitching.. and stitched in and out of the felt folds in all directions.
I theorized that this section would be the most roughed up with play and would have the weakest stitches.
I used very rough stitching.. and stitched in and out of the felt folds in all directions.
I theorized that this section would be the most roughed up with play and would have the weakest stitches.
15. I wanted to then have a way that the bag could stay together. I contemplated sticking a zipper in somehow but I was either too lazy at the thought of working that out, or I didn't feel it could hold up to the weight of a zipper.. I think it was the laziness lol... I decided that I was going to use a button somehow.
I thought about having a flap that folded over the top but couldn't work out a neat way that didn't change the look of the bag..
I thought about having a flap that folded over the top but couldn't work out a neat way that didn't change the look of the bag..
I decided to sew a button on the inside of the bag and cut a button hole on the front of the bag.
Marika chose a button; I sewed it on and then cut a horizontal hole at the front then did lots of loops around the edge of the hole to support the hole. In hindsight the hole is a little too big but I suppose it's easier to fix a bigger hole by sewing it tighter together than it is to make a smaller hole bigger after sewing around the hole.
Marika chose a button; I sewed it on and then cut a horizontal hole at the front then did lots of loops around the edge of the hole to support the hole. In hindsight the hole is a little too big but I suppose it's easier to fix a bigger hole by sewing it tighter together than it is to make a smaller hole bigger after sewing around the hole.
16. I then pondered straps and handles. I decided (for the meantime) on both.
I first worked on the handles:
I cut 2 strips of brown felt ~ 6 inches long.
I folded them in half and straight stitched around the edges to keep it together.
I cut 2 strips of brown felt ~ 6 inches long.
I folded them in half and straight stitched around the edges to keep it together.
17. I then sewed them onto the bag (sewing the same sides of the strap onto the bag). I decided that the handles were too wide for Marika's hands so I then folded the straps in half again and sewed along the edge for about 3 inches of the straps.

18. I moved onto the strap... and thought "urgh, can I be bothered?" lol... but felt, STUFF IT! It's my project... I need to commit to this "me time" business!... even if it meant carrying on doing something that I couldn't be stuffed doing lol
I actually enjoyed the different manipulating of the needle felting... I was sick of using the sewing needle :P
I rolled up the wool tops into oval shaped balls (I thought it suited the rectangular shapes rather than perfect round balls.. anyways, I would've struggled needle felting perfect balls lol)
I worked out after 4 balls that I was roughly 1/4 of the length I wanted.. so I set out on making 16 of them.
19. I then sewed with a needle and thread a few times through the centre of each ball to string them together, tying a knot at the end and then re threading the left over string into the balls.
20. I sewed the end balls onto the top of the pinched edges of the bag.. as with all my other professional sewing, I just stitched all over the shop over and over and over to make sure the ball was well stuck to the bag. :P
Baaaaaag finished! :D
Marika loved the bag ... for about 10 minutes lol...
Long enough to take some pictures :P


I'm pretty happy with it - the fact that I finished it... that I committed to something that could be called MY project.. and it looks pretty :))
Maybe the girls will come to accept "mum's me time"...
I wonder how many projects it will take :P
I suppose we'll see ;)
I wonder how many projects it will take :P
I suppose we'll see ;)
I would LOVE to hear from you all about this project - questions, comments, advice... and your experiences with "me time" around a couple of toddlers ;)
Lots of love,
Lots of love,
Bri!
xxxxxxx
xxxxxxx
"It was tricky sewing through 7 layers of felt at times so I used professional things like my phone to push the needle through from behind" - so good to know I'm not the only one that does this!
ReplyDeleteHahaha!
DeleteThe other week I was sewing something and whatever I was pushing the needle in with slipped.. and I pierced my thumb with the "wrong" end of the needle... it was a gaper and bled a lot lol
After that lesson, I think using a phone is pretty darn smart given it's large surface area and minimal risk to surface pierce our hands lol
This comment has been removed by the author.
ReplyDelete